Ultimate Guide:What is a Graduated Neutral Density Filter
Monday 22 July 2024
 2.5k
2.5k
 Reproduction without the author's authorization is prohibited


A photographer, especially a landscape photographer, always needs to spend a lot of energy to balance the bright and dark parts of the photo. Have you ever encountered such a scene: facing the beach on a sunny day, surrounded by mountains, and the water reflecting the sun, it is a very beautiful scenery. But no matter how you adjust the aperture and shutter speed, you can't get the correct exposure, either the sky is overexposed or the dark part has no details. So how can you get a photo with details in the dark part and no overexposed sky without using software post-processing in this case? One answer is: use Graduated Neutral Density Filter.
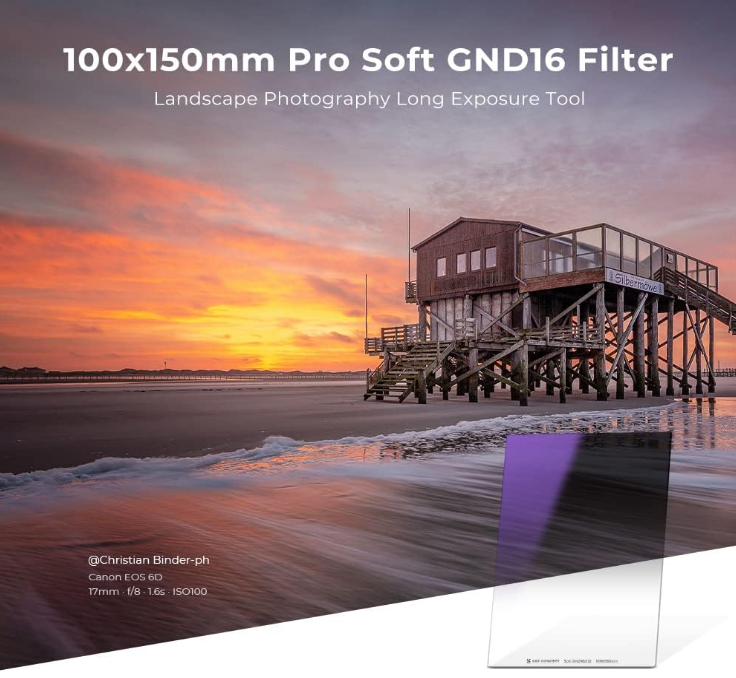
As the name suggests, it has a graduated transition from dark to clear. The primary purpose of a GND filter is to balance the exposure between the bright and dark areas of an image, enabling photographers to capture a more evenly exposed photograph.
In many photographic scenarios, especially when shooting landscapes, there is a significant difference in the light intensity between the sky and the land. The sky is often much brighter than the ground, leading to an overexposed sky and an underexposed land. A GND filter helps mitigate this issue by reducing the brightness of the sky while leaving the exposure of the land unaffected. This results in a well-balanced image with details preserved in both the highlights and shadows.
What does a Graduated Neutral Density Filter do?
A Graduated Neutral Density Filter is very much like a combination of an ND filter and a UV filter, physically balancing the light entering the lens. Its primary function is to reduce the dynamic range of a scene, making it possible to capture details in both the bright and dark areas without overexposing or underexposing any part of the image.
When using a GND filter, the darker part of the filter is placed over the brighter area of the scene, typically the sky. This reduces the amount of light entering the lens from that part of the scene. The clear part of the filter is placed over the darker area, usually the ground or foreground, allowing normal exposure. This technique ensures that both the sky and the ground are correctly exposed, resulting in a balanced and natural-looking photograph.
How many types of GND filters are there?
There are different types of GND filters, each designed for specific situations. Hard-edge GND filters have a distinct, abrupt transition from dark to clear and are ideal for scenes with a clear horizon. Soft-edge GND filters have a gradual transition and are suitable for scenes with an uneven horizon or elements that protrude into the sky. Reverse GND filters have the darkest part in the middle, making them perfect for sunrise or sunset shots where the horizon is the brightest part of the scene.
The Difference between Graduated Neutral Density Filter and Neutral Density Filter
While both Graduated Neutral Density (GND) and Neutral Density (ND) filters are used to control exposure in photography, they serve different purposes and are used in different situations.
Neutral Density (ND) filters evenly reduce the amount of light entering the lens, making it uniform across the entire frame. This is useful in a variety of situations, such as capturing motion blur in water with a slow shutter speed, or achieving a shallow depth of field with a wide aperture in bright light. ND filters are not graduated, meaning they do not have a transition from dark to light; the density is the same across the entire filter.
The most obvious difference is that a Graduated Neutral Density (GND) filter has a gradual transition from dark to light. This makes it particularly useful for balancing exposure in scenes with a high dynamic range, such as a landscape with a bright sky and a darker foreground. The gradual transition allows the photographer to darken only the bright parts of the scene while maintaining the correct exposure for the darker parts.
While both filters are used to manage light and exposure, ND filters are used to evenly reduce light across the entire image, while GND filters are used to balance the exposure between the brighter and darker parts of the image.
What Kind of Graduated Neutral Density Filter is Good
Choosing the right Graduated Neutral Density (GND) filter depends on the specific needs of the photographer and the type of scenes they intend to capture. There are several factors to consider when selecting a GND filter, including the type of gradient, the strength of the filter, and the quality of the materials used.
The type of gradient is an important consideration. Hard-edge GND filters have a sharp, abrupt transition between the dark and clear areas. These are ideal for scenes with a clear, straight horizon, such as seascapes or landscapes with a flat horizon. Soft-edge GND filters have a more gradual transition, making them suitable for scenes with uneven horizons or elements like mountains or trees that protrude into the sky. Reverse GND filters have the darkest area near the center, which fades to clear towards the top and bottom, making them perfect for sunrise and sunset shots where the horizon is the brightest part of the scene.
The strength of the filter, measured in stops, indicates how much light the filter reduces. Common strengths are 1-stop, 2-stop, and 3-stop GND filters. The choice of strength depends on the brightness difference between the sky and the ground. For example, a 2-stop GND filter might be suitable for scenes where the sky is moderately brighter than the ground, while a 3-stop filter would be better for very bright skies.
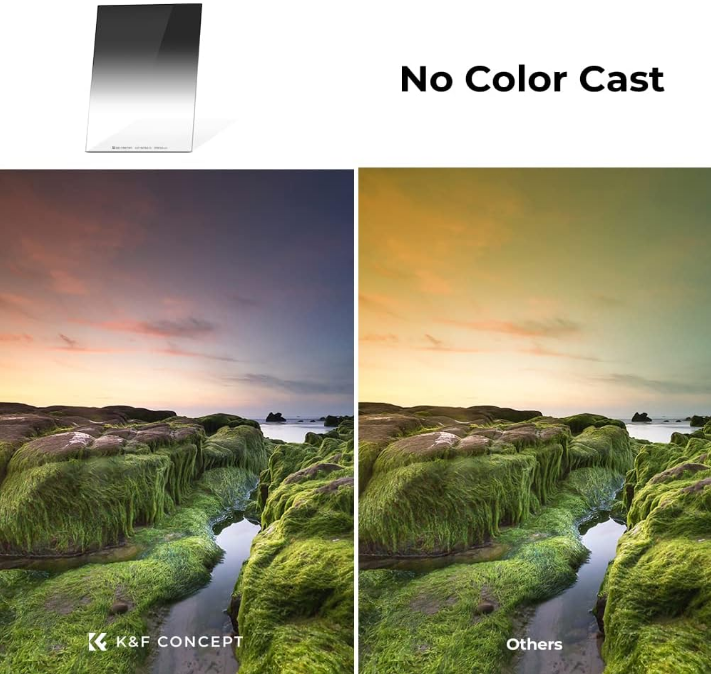
The quality of the filter is also crucial. High-quality GND filters are made from optical glass or high-grade resin, ensuring they do not affect the sharpness or color fidelity of the image. They should also be coated to reduce reflections and increase durability.
Who Needs a Graduated Neutral Density Filter
Graduated Neutral Density (GND) filters are essential tools for photographers who frequently shoot in high-contrast lighting conditions, particularly landscape photographers. These filters are invaluable for anyone looking to capture balanced, natural-looking images in situations where there is a significant difference in brightness between the sky and the ground.
Landscape photographers often encounter scenes where the sky is much brighter than the land, such as during sunrise or sunset. In these situations, a GND filter allows them to balance the exposure, ensuring that both the sky and the land are properly exposed. Without a GND filter, the sky may be overexposed, losing detail, while the land remains underexposed and lacks clarity.
Architectural photographers can also benefit from GND filters, especially when shooting buildings against a bright sky. By using a GND filter, they can ensure that the details of the building are not lost in shadow, while the sky is not blown out.
Even travel photographers can find GND filters useful. When capturing expansive vistas, bustling cityscapes, or serene seascapes, a GND filter helps to maintain a balanced exposure, preserving the natural beauty and details of the scene.
What Should I Do if I Don’t Have a Graduated Neutral Density Filter
While a Graduated Neutral Density (GND) filter is a valuable tool, there are several techniques photographers can use to achieve similar effects if they don't have one available.
One common method is to use exposure bracketing. This involves taking multiple shots of the same scene at different exposure levels – typically one properly exposed for the sky, one for the ground, and one in between. These images can then be combined in post-processing using software like Adobe Photoshop or Lightroom to create a single, well-exposed image. This technique, known as High Dynamic Range (HDR) photography, allows photographers to capture details in both the highlights and shadows.
Another technique is to use a graduated filter effect in post-processing. Many photo editing software programs offer tools that mimic the effect of a GND filter. By applying a gradient mask to the image, photographers can darken the sky while leaving the ground properly exposed. While this approach may not be as precise as using a physical GND filter, it can still produce good results.
Summary
If you are a landscape photographer who likes scenes with large light ratios, or you are a photographer who really likes to take pictures of sunrises, sunsets, and evening glows at sea, then a GND filter will definitely be a worthwhile investment.


-
 GoPro Announces Next-Generation AI Image Processor GP3Wednesday 04 March 2026
 -
 DJI Pocket 4 User Manual LeakedMonday 02 March 2026
 -
 Canon: Next Compact Camera to Pack with Cutting-Edge TechnologySaturday 28 February 2026
 -
 Waist-Level Viewfinder! Canon Showcases Retro-Style Concept CameraThursday 26 February 2026
 -
 OM SYSTEM 50-250mm F4.0 Pro lens is developingWednesday 25 February 2026


 Your account requires approval before you can login.


