Tutorial: How to Take a Picture of the Moon on iPhone
Friday 21 June 2024
 525
525
 Reproduction without the author's authorization is prohibited


Just in case you're anxious to get the answer: Assuming you use iPhone 15 Pro Max, find a dark location with a clear view. Open the camera app and switch to Night Mode. Use the telephoto lens, tap and hold the moon to lock focus, then slide down to reduce exposure. Hold the phone steady and use the self-timer to avoid shaking. Edit the photo in the Photos app by adjusting brightness, contrast, and sharpness for optimal results.
Well, if you are still interested in why I recommend you do this and how to make your photography skills better, you can continue reading.
How Do I Take a Good Picture of the Moon with My iPhone?
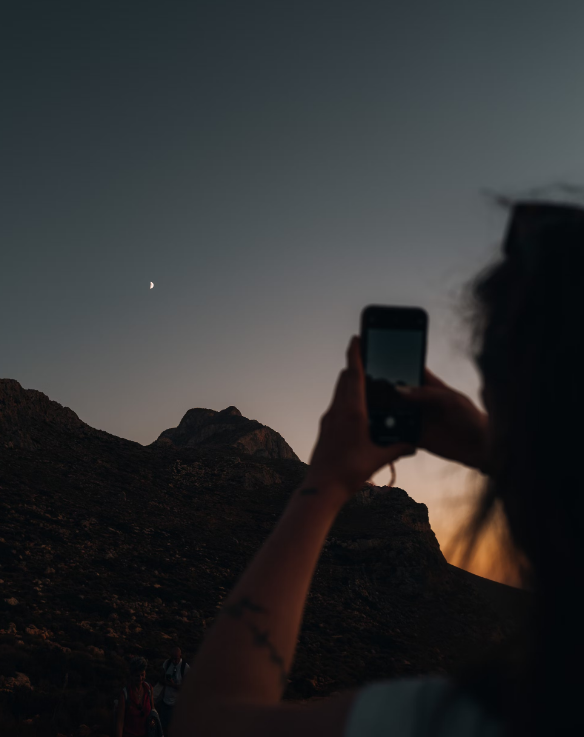
Every time the moon is full or the sky is clear, you want to take out your iPhone to capture the moon's beauty. However, the pictures you get are often unsatisfactory, turning the moon into a small bright spot or an overexposed light. What’s going on, and how can you get clear pictures of the moon using your iPhone?
Taking a good picture of the moon with your iPhone requires some knowledge and preparation. Firstly, you need to understand that the moon is a small, bright object in a vast, dark sky, which poses a challenge for your iPhone's camera sensor. To begin with, you should find a location with minimal light pollution. This will help in capturing the moon more clearly without interference from artificial lights.
Next, use the default camera app and select "Night Mode" if your iPhone supports it. This mode is designed to improve low-light photography. Tap and hold the moon to lock focus and adjust the exposure by sliding your finger up or down. Reducing the exposure will help in capturing more details of the moon’s surface. Additionally, using the zoom feature can help, but be cautious of digital zoom as it can reduce the image quality.
Let's use the iPhone 15 Pro Max as an example to show you how to get the clearest photo of the moon without additional accessories or third-party apps. Follow these steps: Find a location with minimal light pollution and a clear view of the moon. Open the default camera app and switch to Night Mode. Select the telephoto lens for a closer view of the moon. Tap and hold on the moon to lock focus, then slide your finger down to reduce the exposure and prevent overexposure. Hold your phone as steady as possible, using both hands and possibly bracing your elbows against a solid surface. Use the self-timer feature to minimize camera shake when taking the photo. Once you've captured the image, use the built-in editing tools in the Photos app to enhance the picture by adjusting brightness, contrast, and sharpness for the best result.
Why Can't I Take Good Pictures of the Moon with My Phone?
Many people struggle with taking good moon pictures with their phones due to several reasons. One primary reason is the phone camera's limitations in handling extreme contrast between the bright moon and the dark sky. Unlike professional cameras, iPhone cameras have smaller sensors and lenses, making it difficult to capture the details of the moon without overexposing it.
Another issue is stability. Holding your phone steady while taking a photo, especially in low light, is challenging. Even the slightest movement can result in a blurry image. Furthermore, automatic settings on phones are not always optimized for moon photography, often leading to overexposed or underexposed images.
What Do I Need to Make My iPhone Take Better Pictures of the Moon?
To improve your moon photography with an iPhone, you might need a few additional tools and techniques. Firstly, consider investing in a tripod. A stable base will significantly reduce camera shake and help in capturing clearer images. A Bluetooth remote or self-timer can also be useful to avoid touching the phone while taking the photo.
Using a tripod provides a stable base for your iPhone, which is crucial for capturing clear, sharp images, especially in low light conditions. When photographing the moon, even the slightest movement can cause blurriness due to the long exposure times required for night photography. A tripod eliminates this issue by holding your phone steady.
Use an iPhone Tripod to Take Pictures of the Moon
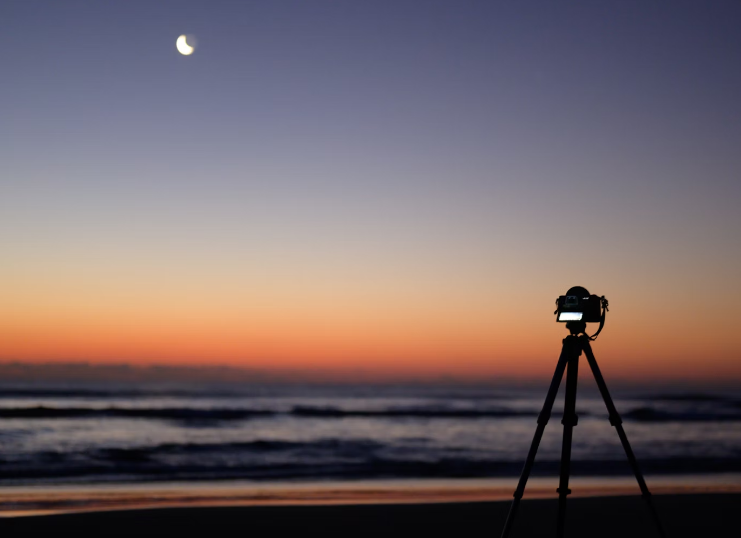
Using a tripod is one of the best ways to ensure stability when taking moon photos with your iPhone. A tripod provides a stable base, eliminating the chance of camera shake, which is crucial for low-light photography. When setting up your tripod, choose a spot with a clear view of the moon and minimal obstructions.
Once your iPhone is mounted on the tripod, use the self-timer or a remote shutter to take the photo. This prevents any movement caused by pressing the shutter button. You can also use the "Live Photos" feature, which captures a short video before and after you press the shutter button, allowing you to choose the best frame.
If you are interested in mobile phone tripods, I recommend KF Concept Aluminum 4-Section Tripod: Your essential companion for photography enthusiasts seeking stability and versatility. Crafted from lightweight yet durable aluminum alloy, this tripod ensures steadfast support with its 4-section legs and non-slip rubber feet, ideal for any terrain. Its precision-engineered ball head and quick-release plate enable seamless adjustments, empowering you to capture every moment with clarity and precision. Compact and portable, it folds down to [insert folded size], making it perfect for travel. Elevate your photography with the KF Concept tripod—where durability meets versatility for every photographic endeavor.


@2x-235x175.png)

-
 Fujifilm fixed-lens medium-format camera to be released on March 20Tuesday 25 February 2025
 -
 Sigma latest compact full-frame camera Sigma BFMonday 24 February 2025
 -
 Canon releases PowerShot V1 camera, 22.3mp 1.4-inch CMOSThursday 20 February 2025
 -
 Canon PowerShot V1 camera specsWednesday 19 February 2025
 -
 Rumored:Nikon Z5 II specsMonday 17 February 2025


 Your account requires approval before you can login.

